
Read the following suggestions carefully on how to remove old paint
or varnish.
They can help you do a better job with considerably less effort.
Before Proceeding I Strongly Suggest you Look Over
the Safety and Setting up Guidelines !
|

REMOVING PAINT OR VARNISH WITH CHEMICALS
- Many home repair jobs require you to remove a coat of old paint or varnish before
applying new finish.
- You can remove old paint or varnish using one of three different methods. The first
involves using a chemical paint or varnish remover to soften the painted surface. Then,
the old paint can be scraped off or washed away with water.
- Paint can also be sanded away or removed with heat. In most cases, chemical paint
removers are the easiest and fastest means for removing old paint or varnish.
- Chemical paint and varnish removers are available in a variety of semi-paste and liquid
forms. Almost all chemical removers are referred to as "paint removers" or
"paint strippers."
- There are several basic types of paint removers.
- Liquids are primarily for clean coatings and removing one or two layers of paint.
This formula dries too quickly to remove multiple layers of paint. Good for detail areas
or irregular surfaces. Also good for the stubborn spots after a washable has been used.
- Brushables are a thick, paste-like formula that allows the paint remover to be
applied in heavy layers so that it stays wet in order to strip multiple layers (up to 10
or more) in one application. Allows remover to cling to vertical or even overhead
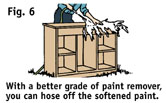
surfaces. Some paint removers are the "wash away" or "water wash"
types. These terms simply indicate that the paint remover formula includes an emulsifier
that permits the chemicals to mix with water and be rinsed away with a hose.
- Use care when using this type of remover on fine furniture. Too much water can cause
damage to the grain in the wood.
- Read the labels on all paint remover cans and follow the manufacturer's instructions
carefully.
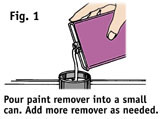
- When removing paint, pour part of the paint remover into a small, wide mouth metal can
(Fig. 1). A can with a plastic resealable lid works especially well.
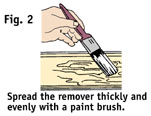
- Using a good quality brush, spread the remover thickly and evenly over the surface.
Brush in one direction (Fig.2 ) Try not to brush over areas that are already covered with
paint remover.
- Sprayables are for easy application. Some removers come with a spray bottle or
sprayer. These removers are thin enough to spray yet thick enought to cling. Most of these
removers are "water washable."
- Aerosols are the most convenient and fastest way to apply paint remover. These
removers are sprayed on and create a foamy, clinging layer thick enough to remove several
layers of paint. If needed, reapplication is much easier, too! These removers are perfect
for smaller jobs and detail work where brush application is difficult. Aerosol paint
removers are available almost everywhere conventional removers are sold.
- Some newer removers contain chemicals that are more "environmentally
friendly." These removers generally work slower than more conventional types, but
some allow use indoors with good ventilation. These are more expensive, but for people who
are sensitive toward harsh chemicals, may offer an excellent choice.
- In addition, several types of specialty removers are sold to remove certain coatings or
using on a specific surface, These include stain removers for surfaces such as fiberglass.
- After scraping, use a suitable solvent such as ethanol or mineral spirits (or water if a
"water washable" paint remover was used.)
- For difficult to remove coatings, removal can be speeded up by scratching the coating
with coarse sandpaper, but be careful not to deeply scratch the underlying surface. Then
apply the remover and cover with plastic film to keep the remover wet.
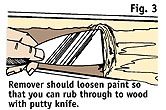
- Check the label of the paint remover to see how long you should leave the remover on the
surface, usually about 20 to 30 minutes. Test the condition of the surface by rubbing the
blade of a chemical-resistant scraper in a circular motion to see if the paint has been
loosened (Fig. 3).
- If the scraper cuts through to the surface of the wood, the paint remover has done its
job. Always wear chemical-resistant gloves and work in a well-ventilated area.
- Apply paint remover to a manageable area. Only cover an area that allows you to scrape
or wash away the paint remover before it dries.
- Lay the paint remover on thick, and do not stir it after applying it to the surface.
Give the chemicals time to act.
- To help keep the area clean and make clean-up easier, use a cardboard box with a heavy
layer of newspaper to catch the paint and remover.
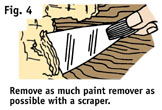
- When the paint remover has done its job and the surface is softened (Fig. 3), you are
ready to remove the loose paint. It is usually best to remove as much remover and paint as
possible the first time. A scraper works well for this (Fig. 4).
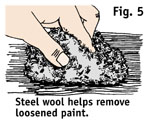
- Follow this with a medium grade of steel wool, old rags or an abrasive scouring pad
(Fig. 5).
- For hard-to-remove spots, you may need to apply a second coat of paint remover. Wetting
the steel wool with paint remover will also work in some cases.
- After cleaning and allowing to dry, most surfaces will need to be lightly sanded to
prepare the surface. With a better grade of remover, no sanding or swabbing is necessary.
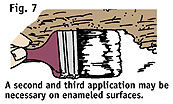
Some types of paint can be especially hard to remove. This usually requires a second coat
of paint remover after you have removed the first coat of enamel (Fig. 7). If the surface
has several layers of paint, it may be necessary to apply paint remover a third time.
|
 |

REMOVING PAINT OR VARNISH BY SANDING
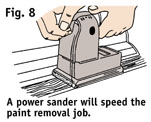
- Paint or varnish can be sanded away with any type of power or hand sander (Fig. 8). For
bigger sanding jobs, you'll want to use a power sander. Belt, disk or drum sanders can be
used.
- Although sanding removes a painted surface quickly and easily, it has one basic
disadvantage - it also removes some of the wood surface underneath the paint. If you are
working on a fine piece of furniture, sanding is not recommended.
- When sanding old paint or varnish from the surface, use open coat, coarse sandpaper.
Fine sandpaper clogs up quickly, making it ineffective as a paint remover.
- As a rule, sanding is recommended only on extremely rough jobs. Chemical paint removers
are much more effective and easier to use.
|
|

REMOVING PAINT FROM IRREGULAR SURFACES
- Unfortunately, all painted surfaces are not smooth and even. For curved surfaces,
cut-out areas and other hard-to-reach places, use chemical paint removers.
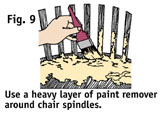
- Paint around the spindles of a chair is especially hard to remove. Run a heavy layer of
paint remover into the crack around the spindles (Fig. 9). Let it set for about 20
minutes, then scrape away the old paint and apply more remover as needed.
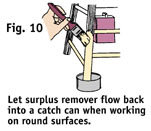
- Apply paint remover to the legs of chairs, tables and other such round surfaces with a
regular paint brush (Fig. 10). Set the legs of the chair in a small metal can or container
to catch the surplus paint remover as it runs down the leg of the chair. Brush upward on
the legs to reuse the surplus remover.
- Use plenty of paint remover on rounded surfaces. Apply a heavy layer, let it set and
remove and reapply as necessary until all the old paint or varnish is removed.
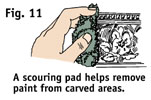
- A scouring pad is excellent for removing paint or varnish from carved areas on furniture
(Fig. 11). Copper scouring pads or plastic cleaning pads can be forced into the carved
areas to remove the old paint or varnish after it has been softened by paint remover. You
can also use steel wool to remove old paint from such areas.
- Always rinse the surface of carved areas after the old paint or varnish has been removed
with a scouring pad.
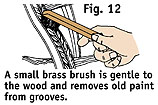
- When a scouring pad or steel wool cannot be forced into narrow slits or grooves, try
using a brass wire brush (Fig, 12). Be careful not to press too hard when using the brush.
Wood softened by paint remover can be marred if you apply too much pressure.
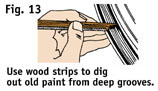
- If a wire brush cannot reach into extremely small grooves, try scraping the paint out of
the grooves with a small stick of wood (Fig. 13). A splintered piece of wood from a small
board can often be used as a handy tool for removing old paint from grooves.
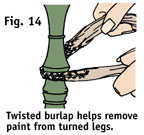
- Removing paint from turned legs on tables can be difficult (Fig. 14). Rub a twisted
piece of burlap like a shoeshine cloth over the paint remover after it has set for about
20 minutes. This will usually remove the old paint quickly and easily.
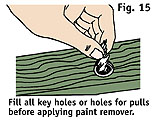
- Some surfaces cannot tolerate paint remover. For example, key holes or holes where
cabinet hardware has been removed should be plugged with paper before you apply the paint
remover.
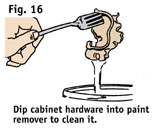
- You will probably replace your cabinet hardware with new hardware after the surface is
repainted. However, if you want to reuse the old hardware, dip it into paint remover for
complete cleaning (Fig. 16).
- Wash the hardware thoroughly after it is dipped into the remover, then spray each piece
with a clear lacquer to rebrighten the surface.
|
 |
 REMOVING
PAINT WITH HEAT REMOVING
PAINT WITH HEAT
- You can also remove paint with heat, which destroys the film in the old paint. This
makes it easy to scrape the old paint away (Fig. 18). Special electric paint removers or
heat guns use heat for paint or varnish removal.
- Scrape away the paint immediately after it is heated. Use a broad paint scraper for
removing the heated paint right behind the electric softener.
- Remember that you should never allow the heat gun to stay in one spot long enough to
burn the wood. Keep moving often to avoid browned or darkened spots on the surface from
excessive heat.
|
TOOL AND MATERIAL CHECKLIST
| Paint Remover |
Chemical Resistant Gloves |
Paint Brush |
Scouring Pad |
Garden Hose |
4" Scraper |
| Sandpaper |
Scrap of Burlap |
Hand Cleaner |
Steel Wool |
Plastic or Metal Pail |
| Power Sander |
Brass Wire Brush |
Narrow Brass Brush |
Small Can with Plastic Lid |
Check your state and local codes before starting any project. Follow
all safety precautions. Information in this brochure has been furnished by the National
Retail Hardware Association. Every effort has been made to ensure accuracy and safety.
Neither the NRHA nor the retailer can be held responsible for damages or injuries from the
use of the information in this document.
|
Need Supplies?
Shopping
Directory

Next time you Paint You Can also INSULATE!

Here's How
Do you
Collect?
Want to try EBAY?
Its all Here
Auction tutorials
Appraisal Services
How to Buy & Sell
Get Your How-To
Books
Videos
and Tools at

You can Help Us
by Telling-A-Friend
|