For this example we are going to spray a popcorn ceiling.
The first step is to cover up everything you Do Not want painted!.
Move the furniture away from the wall 3' or so and cover with lightweight plastic. Remove or mask light fixtures, move all pictures, mirrors etc to another room and cover the floor with dropcloths, canvas or disposable paper dropcloths, available at your paint store or home bldg center.
If the walls are not going to be repainted you will need to mask them off using lightweight plastic or 3' wide brown craft paper.
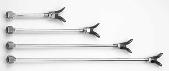 When you pickup your spray unit from the paint store or rental store ask for an "extension" for the gun. These simply screw onto the gun allowing you extended reach and eliminating ladders, Very Handy.
Mix all your paint into the 5 gallon pail, insert the dip tube from the pump into the bucket or fill the hopper depending on which unit type you have, make sure all your fittings are tight.
Now, all units have two control knobs, a pressure control and a pump/recirculate knob. In the recirculate mode the paint simply recirulates thru the unit, pumping out trapped air and allows the pump to prime.
Turn the knob to recirculate and turn on the power switch. Allow the pump to run for 2 minutes or so and it will prime and push out any trapped air.
Now we are going to adjust the pressure. The biggest mistake most people, even some professionals, is spraying with too much pressure.
You need just enough pressure to create an even fan with no "tails" which are thick lines at the edge of the spray pattern. Backout the pressure knob and screw it in about 1/3rd of the way (screwing in increases pressure), point the gun at the surface to be painted or a piece of cardboard for testing and with your hand in motion, pull the trigger.
Kind of scary isn't it :-)
See, no big deal......
Now that the initial fear factor is gone lets do it again and this time pay attention to the edge of the fan. If you see a thick stream at the edge of the fan increase the pressure 1/4 turn at a time until the tail is gone.
Now you have the proper amount of pressure for the material you are spraying.
Technique!!! Every time you pull the trigger you must follow the same routine. Remember that the second you pull the trigger the paint comes out instantly so, start your hand in motion first and then pull the trigger, release the trigger just before you reach the stopping point of your swing. In about 10 minutes you will have it down to a science, just remember...
hand in motion, pull trigger, spray, release trigger, stop hand motion. Should you mess up and load an area with too much paint simply take a brush and spread it out.
Maximum transfer of paint is accomplished by holding the gun at the proper distance from the surface to be painted. Too close and you apply too much paint, too far away and you introduce a lot of spray into the air as it is not hitting the surface. This distance varies and depends on the amount of pressure you are using and the viscosity of the paint so experiment until you find the proper distance, normally 12" or so is about right.
As in all painting jobs start with the difficult areas, where you would "cut in" and leave the large mass areas for the end. On a ceiling for example, spray up next to the edge first, near the wall and then spray out towards the center. On walls you want to start at the door and window openings spraying away from the opening and out towards the large area of the wall.
I cut pieces of cardboard about 12" wide an 3' long and use them as a shield holding them up against the areas I want to protect. cut several and when they become loaded with paint lay them aside to dry and you can reuse them later. Its a good idea to keep a bucket of clean water and a sponge handy too, you are going to slip up and overspray onto something you don't want painted and this way you can clean it easily.
When you have finished be sure and clean the equipment up, most rental places charge a pretty hefty cleaning charge if you return the unit dirty.
Put the dip tube into a clean bucket of water, back off on the pressure and put the gun into the 5 gallon pail of paint holding the tip just under the surface of the paint. The line has about 1 qt of paint in it and you can push it through with water. As soon as you see the water coming out release the trigger, move the gun over to the bucket of water again holding the tip just under the surface, and pump the water for about 2-3 minutes. Dump the water repeat the process until the water runs clean. Normally 3-4 rinses are necessary.
Power OFF! Trigger the gun to release the pressure , clean off the exterior of the gun with a wire brush, remove the tip, clean it well and replace it. Be sure and replace the filters before returning the unit if you removed them earlier.
I think you will agree that an airless is not only a great time saver but also a very efficient way to apply paint resulting in a very uniform evenly distributed paint film.
For those of you who are spraying your attic with Hy-Tech Radiant Barrier paint I have a few more tips for you Here
You Can Download the entire tutorial and save it for reference.
Requires Acrobat Reader
(Click on Logo to get it Free)