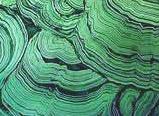
Malachite Technique - Step by Step
 Materials:
- Latex paints A medium green and black
- Paint conditioner,( flotrol)
- Latex glazing liquid
- Corrugated cardboard
- lightweight plastic either a drop cloth or bread wrappers.
- Assorted brushes
- Utility knife
1. Prime new wood or lightly sand and clean a previously painted piece. Apply green coat. Let Dry.
2. To create Malachite, make your design graining tools from pieces of card board cut into widths from one to six inches. Small pieces like little boxes only require a few small pieces and naturally the larger the piece the larger the "combs". Score through the top layer of the card board, 1 inch above the bottom edge. Peel the paper to expose the corrugated layer. Cut irregular spaced "V" shaped slits along the edge. Sizzors work good for this.
3. Mix the dark over glaze using equal parts black paint, paint conditioner, and glazing liquid and randomly brush the glaze over the green surface. You want an uneven application with areas darker and lighter all over.
4.Now you start making the pattern, use the widest tool first to make linear, wavy, or concentric forms. Use smaller tools to fill in. Look at the pattern and you will see that it is a series of 1/2 circles starting with a large one overlapped with a smaller and so on.
5.When you are finished with the piece or a side of a box for example, take a small pce of light weight plastic (about the thickness of a bread wrapper)and gently lay it onto the surface without moving it around, then pull it up and off. This will soften the edges..I also use a very fine mist spray bottle sometimes and let a light mist fall on the surface.
Allow you project to dry well and apply a protective coat of latex base polyurethane, either satin or gloss.
Don't be afraid of doing something wrong,its easy to wipe it off and try again and like I mentioned in the introduction to Faux finishes, You are the Artist, its what looks good to You that counts!!
