Here are tips and suggestions on how to install plastic laminate, ( formica ) countertops.
These instructions can save you time, money and effort.
Note: If you want to try and save the old top and reuse it, see the artice,
How to Remove Formica
Laminated plastics are available in many colors, patterns and designs. They
can be used for countertops, tabletops and many other surfacing applications.
The sheets are available in dull or gloss finish.
Laminated plastic is made from layers of paper that are first impregnated with resin and then bonded together under pressure and high temperature, forming a rigid sheet.
These instructions include:
- Preparing the Surface for Laminate Plastic
- Cutting Laminated Plastic
- Applying Laminated Plastics
- Finishing Off the Job
|
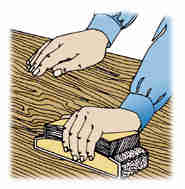
FIG.
1 - Sand and clean the surface before applying plastic laminate.
|

PREPARING THE SURFACE FOR
LAMINATE PLASTIC
- Laminated plastic sheets of 1/16" thickness are recommended for a flat work surface. You can use laminated plastic of 1/32" thickness on vertical surfaces.
- Thoroughly sand and clean the surface where plastic laminate is to be applied (Fig. 1). Remove any paint or varnish before applying the laminated plastic.
- Most manufactured countertops are made using a high-density particle board. However, regular particle board and even plywood make ideal bases for
plastic laminates.
|
|
|
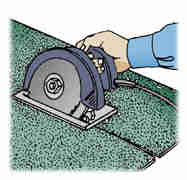
FIG. 2 - You can cut plastic laminate with a regular circular power saw and a fine-tooth blade.
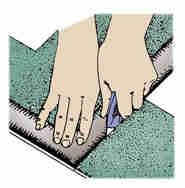
FIG. 3 - Plastic laminate
can be cut with a utility knife or using special laminate blades.
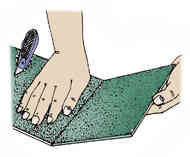
FIG. 4 - The laminate will snap after it is scored.
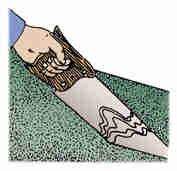
FIG. 5 - You can cut plastic sheets with a fine-tooth hand saw.
|

CUTTING LAMINATED PLASTIC
- You can cut plastic laminate material with a circular
saw, saber saw, backsaw or utility knife. The saw blade should be a
fine-tooth blade (Fig. 2). A strip of masking tape placed where the
cut line is to be made helps prevent chipping and makes the line easier
to see.
- When using a power circular saw or saber saw, cut from the back side of the laminate. These saws cut on the upstroke. Cutting from the back will help prevent chipping. On hand saws, cut from the front side at a low angle.
- Important: Always cut the sheets of laminated plastic slightly oversized to allow for trimming.
- Special laminate cutting blades are available to use with utility knives (Fig. 3). Use a straightedge or a steel square to guide the knife for a smooth and even cut.
- Score the sheet of laminated plastic with the utility knife. Then snap it on the scored line by lifting the shorter end and applying slight pressure (Fig. 4).
- You can also cut laminated plastic sheets with a fine-tooth hand saw (Fig. 5). The type of cutting tool you use depends on how big the job is.
|
|
|
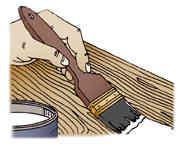
FIG. 6 - Brush contact cement over the counter surface after sanding and cleaning it.
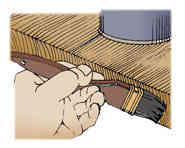
FIG. 7 - Apply two or three coats of contact cement on any trim strips along the counter edges.
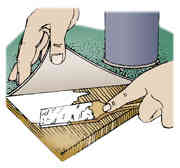
FIG. 8 - You can use a handmade wood paddle for spreading the contact cement.
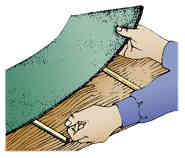
FIG. 9 - Use pieces of dowel rod to position the sheet of plastic laminate.
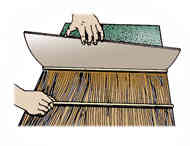
FIG. 10 - On large areas, longer dowel rods are needed to hold the laminate away from the cemented surface.
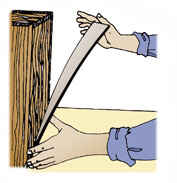
FIG. 11 - Sheets applied to vertical areas do not normally require a protective shield of paper.
|

APPLYING LAMINATED PLASTICS
- Usually, you can apply laminated plastics with contact cement. Epoxy adhesives can be used, but contact cements are recommended.
- Use coarse sandpaper to roughen the surface to be covered. Clean away the sanding residue with a light brush or with compressed air.
- After sanding, brush the contact cement onto the counter surface (Fig. 6). Also apply a smooth and even layer of contact cement to the back of the clean laminate sheet. Let both surfaces dry. Check the contact cement label for the recommended drying time. The general rule is the cement should be dry to the touch. A weaker bond will result if you wait too long.
- Use extreme care when laying the sheets. Remember,
50 percent to 75 percent of the bonding strength of contact cement is
present in the first contact. Make sure the pieces are accurately positioned
before the glued areas touch each other.
- You may need to apply two to three coats of contact cement for the trim strips along the counter edges (Fig. 7).
- You can use a regular paintbrush for applying the contact cement to both the back of the laminated sheet and the flat surfaces. However, in some cases, a handmade paddle of wood may be better for spreading the cement (Fig. 8).
- After the recommended drying period, you are ready to position the sheet of laminate.
- Keep the sheet of laminate and cemented base apart until they are correctly positioned. On narrow strips, lay short lengths of dowel rods about 12" apart between the two cemented pieces until they are properly positioned (Fig. 9). The dowel rods can be moved along the surface to keep the cemented pieces apart during positioning.
- When laying a large sheet of laminate, use longer dowel rods (Fig. 10). Keep the 12" spacing between the dowel rods. Be sure to use dowels that are at least 1/4" in diameter. The larger the better.
- When applying laminated sheets to vertical surfaces, you can usually position the glued sheets without using wooden strips or waxed paper (Fig. 11).
|
|
|
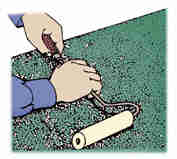
FIG. 12 - Use a roller to apply pressure to the newly laid sheets.
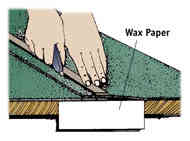
FIG. 13 - Place a strip of waxed paper along the joint area.
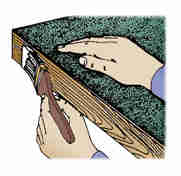
FIG. 14 - After applying two coats of cement to edges, apply one coat to back of laminate.
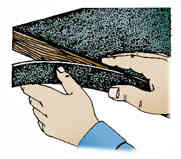
FIG. 15 - Place the edge strip into position carefully.
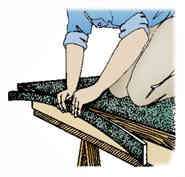
FIG. 16 - On long spans, apply pressure to edge strips in the center and work to the edges.
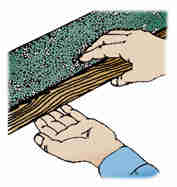
FIG. 17 - Edge stripping should be slightly wider than the edge to be covered. The extra width goes at the bottom.
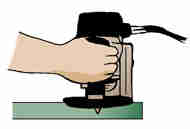
FIG. 18 - Hold the router firmly with both hands and move slowly.
|

FINISHING OFF THE JOB
- When the laminate is correctly positioned, remove the dowel rods one at a time as you bond the two pieces together.
- Use a roller to apply pressure to the newly laid sheets of laminated plastic (Fig. 12). Roll the entire surface thoroughly to eliminate air pockets and to be sure the plastic sheet is firmly attached to the surface at all points.
- If the plastic laminate you are using is not large enough to do the entire job, you will need to make a seam. To do this, first bond the larger of the two pieces into place.
- Put a narrow strip of wax paper down along the edge of the larger piece (Fig. 13). Use the dowel rods again to keep the second piece of laminate away from the cemented surface. Begin at the seam and position the second piece tightly against the first. You may want to tape this second piece to the first to help hold it in place.
- After you have used your roller to firmly attach the
second piece of laminate, go back and carefully lift the edge over the
wax paper. Remove the wax paper and reposition the laminate. Finish
by using your roller to apply pressure, working from the center of the
laminate toward the seam.
- You can also use a wooden block and mallet to assure good adhesion at all points on the newly laid surface. Work from the center of the surface toward the edges to work out any air bubbles that might be hidden underneath.
- You may want to use special metal or plastic moldings to finish off the edges of the plastic laminate installation. Or you may want to use thin edging strips of the same material to create a neat edge.
- When using the same laminate material for edging, apply two coats of cement to the edges and let it dry thoroughly (Fig. 14). Then apply one coat of cement to the back of the laminated sheet.
- Place the edge strip into position carefully, using your fingers to align the sheets along the top edge as they are applied (Fig. 15).
- It is usually best to start applying pressure to the edge strips in the center of each strip (Fig. 16). Work in both directions from the center on long spans. Work short spans from end to end.
- If you need to trim away surplus material or cut portions
of the edging strip you can use a fine-tooth backsaw, a router or a
file.
- Run your hand along the edge stripping (Fig. 17). It should be slightly wider than the edge it covers. However, the extra width should be at the bottom. It must be perfectly aligned at the top.
- To finish the edges on your counter top, first allow
the contact cement to dry according to the manufacturer's directions.
If you have a small amount of finishing to do, you can use a file set
at a slight angle. However, most laminate edges today are finished with
routers.
- There are special router blades for finishing plastic laminates. The most popular are a flush cut blade and a beveled blade. Some feel the beveled blade helps to keep the laminate from chipping along the edge. If you are laminating a large area, you many want to use a carbide router bit. A bit with a bearing makes the job even easier.
- To finish your laminate edges, begin by cleaning the base of your router. Anything stuck to the base or any burrs on the base could scratch your laminate. Putting tape on the base can help take care of this.
- If you are using a bit that requires a guide, set the guide carefully. The bit should cut the edge of the laminate but not the adjoining surface. It is always better to take off a little and make a second pass than to take off too much the first time.
- Set the router on the laminate and use a firm steady downward pressure to hold the router in place (Fig. 18). Do not rush the router, move slowly along the edge of the laminate. Quick movements can cause the router to jump or kick, which can ruin the laminate.
- Remove any surplus contact cement with a special solvent. You can use nail polish remover for this purpose.
|
|
| Check your state and local codes before starting any project. Follow all safety precautions. Information in this document has been furnished by the National Retail Hardware Association (NRHA) and associated contributors. Every effort has been made to ensure accuracy and safety. Neither NRHA, any contributor nor the retailer can be held responsible for damages or injuries resulting from the use of the information in this document.
|
|
|